Also known as the Vikkel Braid or Estonian Braid, the Lateral Braid is a special knit stitch that is not like most other knit stitches. This stitch creates a braid that runs laterally or horizontally across the work. Because of the complexity of the techniques, this stitch is rated Experienced. The written directions below may be a little confusing for those who’ve never knitted something similar so please check out the video that will show you how to knit the lateral braid.
This stitch was knitted with the stockinette stitch as the background.
Pattern
Skill: experienced
Any number of stitches
Cast on one stitch. *ktbl of second st on left-hand needle, do not slide sts off needle, knit first st. Now slide both stitches off needle.Then, slip the last worked stitch from the right needle back to the left needle. Repeat from * to last st.
When you get to the last stitch, knit it, then pass the second stitch on the right needle over.
As most of you know, I have been working on a new scarf, shown here:
After working on this for about a week, my lack of patience and my A.D.D. was getting to me. I thought I’d take a break from the large project and work on something much smaller and faster.
For the longest time I’ve been telling everyone that I was going to knit my dog, Buster, a bow tie. So I decided to take this opportunity to actually do what I’ve been saying I’d do. Buster’s getting a bow tie. Oh that lucky dog! 🙂
Not straying too far from my current project design, I went ahead and designed this bow tie using the lateral braid stitch which can be seen on the scarf above. I discovered the lateral braid technique several weeks ago and I’ve been obsessed with it ever since.
Buster is either contemplating life or scheming and plotting on how to get out. Poor thing looks like a hot mess! Need to get him groomed.
Buster’s Knitted Bow Tie is done in three sections: main piece, center tie and the collar. I’ve made three videos for this pattern to help you in making this project. I decided to use left over yarn from my previous project, Easy Knit Fingerless Gloves, for this bow tie.
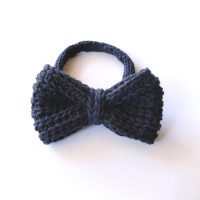
All pieces of the bow tie, except the collar portion, are knitted using the lateral braid.
After completing the bow tie, I realized that it is a little large for my little dog. This pattern is more suited for a large dog or for a person.
Here is the pattern:
Materials
1 skein of Lion Brand Cotton Ease Yarn
Color: Charcoal
207 yds/188 m per skein
3.5 oz/100 g per skein
US 8/5mm needles
50% cotton/50% acrylic
2 US 8/5mm DPNs
Yarn/tapestry needle
Gauge
17 sts x 24 rows=4″
Pattern
Main Piece
CO 35 sts.
Row 1: purl Row 2: cast on one stitch. *ktbl of second st on left-hand needle, do not slide sts off needle, knit first st. Now slide both stitches off needle.
Then, slip the last worked stitch from the right needle back to the left needle. Repeat from * to last st.
When you get to the last stitch, knit it, then pass the second stitch on the right needle over.
CO 5 sts. Using DPNs, begin to makeI-Cord. Knit until it reaches approximately 11″ (28 cm) or until desired length. Bind off.
With yarn needle, sew the ends of the main piece together. Then pinch the middle, wrap the center tie piece around it and sew into place. Last but not least, attach the I-Cord to the bow to make the collar.
The next time I make this, I think I’m going to attach it to a pin or a hair tie and wear it myself 🙂
Intended for personal use only and NOT selling or re-selling purposes. Please be considerate when using our patterns by allowing us credit for our hard work.